01 部署 aws load balancer controller
权限配置
下载 controller 所需的权限策略模板
curl -O https://raw.githubusercontent.com/kubernetes-sigs/aws-load-balancer-controller/v2.4.7/docs/install/iam_policy.json创建策略名为 AWSLoadBalancerControllerIAMPolicy
aws iam create-policy \
    --policy-name AWSLoadBalancerControllerIAMPolicy \
    --policy-document file://iam_policy.json
验证并查找 policy 的 ARN
aws iam list-policies --query 'Policies[?PolicyName==`AWSLoadBalancerControllerIAMPolicy`]'[
{
"PolicyName": "AWSLoadBalancerControllerIAMPolicy",
"PolicyId": "ANPAWGSUISDNLXYV5V7T3",
"Arn": "arn:aws:iam::421234526266:policy/AWSLoadBalancerControllerIAMPolicy",
"Path": "/",
"DefaultVersionId": "v1",
"AttachmentCount": 1,
"PermissionsBoundaryUsageCount": 0,
"IsAttachable": true,
"CreateDate": "2023-08-13T11:41:46+00:00",
"UpdateDate": "2023-08-13T11:41:46+00:00"
}
]创建 Controller 所用的 Service Account
eksctl create iamserviceaccount \
  --cluster=eksdeomo1 \
  --namespace=kube-system \
  --name=aws-load-balancer-controller \
  --role-name AmazonEKSLoadBalancerControllerRole \
  --attach-policy-arn=<policy-arn> \
  --approve
使用 Helm 部署 Controller 到 EKS
helm repo add eks https://aws.github.io/eks-charts
helm repo update ekshelm install aws-load-balancer-controller eks/aws-load-balancer-controller \
-n kube-system \
--set clusterName=eksdemo1 \
--set serviceAccount.create=false \
--set serviceAccount.name=aws-load-balancer-controllerkubectl get deployment -n kube-system aws-load-balancer-controllerNAME READY UP-TO-DATE AVAILABLE AGE
aws-load-balancer-controller 2/2 2 2 1h02 部署示例应用
apiVersion: rbac.authorization.k8s.io/v1
kind: Role
metadata:
  name: app-demo-role
rules:
- apiGroups: [""]
  resources: ["configmaps"]
  resourceNames: ["app1-demo", "app2-demo", "nginx-ssi"]
  verbs: ["get", "watch", "list"]

---
apiVersion: v1
kind: ServiceAccount
metadata:
  name: app-demo-sa

---
apiVersion: rbac.authorization.k8s.io/v1
kind: RoleBinding
metadata:
  name: app-demo-role-binding
subjects:
- kind: ServiceAccount
  name: app-demo-sa
roleRef:
  kind: Role
  name: app-demo-role
apiGroup: rbac.authorization.k8s.ioapiVersion: v1
kind: ConfigMap
metadata:
name: app1-demo
data:
index.shtml: |
<html>
<head><title>App1</title></head>
<body>
<h1>APP 1</h1>
<p>Pod IP: <!--#echo var="SERVER_ADDR" --></p>
</body>
</html>
ip.shtml: |
<!--#echo var="SERVER_ADDR" -->
health.html: |
OK
---
apiVersion: v1
kind: ConfigMap
metadata:
name: app2-demo
data:
index.shtml: |
<html>
<head><title>App2</title></head>
<body>
<h1>APP 2</h1>
<p>Pod IP: <!--#echo var="SERVER_ADDR" --></p>
</body>
</html>
ip.shtml: |
<!--#echo var="SERVER_ADDR" -->
health.html: |
OK
---
apiVersion: v1
kind: ConfigMap
metadata:
name: nginx-ssi
data:
default.conf: |
server {
listen 80;
server_name localhost;
location / {
ssi on;
ssi_silent_errors on;
ssi_types text/shtml;
root /usr/share/nginx/html;
index index.shtml;
}
}apiVersion: apps/v1
kind: Deployment
metadata:
name: app1-deployment
spec:
replicas: 2
selector:
matchLabels:
app: app1
template:
metadata:
labels:
app: app1
spec:
serviceAccountName: app-demo-sa
containers:
- name: nginx
image: nginx
ports:
- containerPort: 80
volumeMounts:
- name: html-volume
mountPath: /usr/share/nginx/html
- name: ssi-config
mountPath: /etc/nginx/conf.d/default.conf
subPath: default.conf
volumes:
- name: html-volume
configMap:
name: app1-demo
- name: ssi-config
configMap:
name: nginx-ssi
---
apiVersion: apps/v1
kind: Deployment
metadata:
name: app2-deployment
spec:
replicas: 2
selector:
matchLabels:
app: app2
template:
metadata:
labels:
app: app2
spec:
serviceAccountName: app-demo-sa
containers:
- name: nginx
image: nginx
ports:
- containerPort: 80
volumeMounts:
- name: html-volume
mountPath: /usr/share/nginx/html
- name: ssi-config
mountPath: /etc/nginx/conf.d/default.conf
subPath: default.conf
volumes:
- name: html-volume
configMap:
name: app2-demo
- name: ssi-config
configMap:
name: nginx-ssikubectl apply -f 01-demo-deploy-manifestsrole.rbac.authorization.k8s.io/app-demo-role created
serviceaccount/app-demo-sa created
rolebinding.rbac.authorization.k8s.io/app-demo-role-binding created
configmap/app1-demo created
configmap/app2-demo created
configmap/nginx-ssi created
deployment.apps/app1-deployment created
deployment.apps/app2-deployment createdkubectl get deployNAME READY UP-TO-DATE AVAILABLE AGE
app1-deployment 2/2 2 2 36s
app2-deployment 2/2 2 2 35s03 基础使用
创建资源
apiVersion: v1
kind: Service
metadata:
  name: nlb-basic
  labels:
    app: nlb-basic
  annotations:
    service.beta.kubernetes.io/aws-load-balancer-scheme: "internet-facing"
    # service.beta.kubernetes.io/aws-load-balancer-scheme: "internal"
spec:
  type: LoadBalancer
  selector:
    app: app1
  ports:
    - port: 80
targetPort: 80Tips : 默认状态下, 如果不加 service.beta.kubernetes.io/aws-load-balancer-scheme: "internet-facing" 会创建一个 Internal 的 NLB. 添加此 Annotation 后, 声明创建一个 internet-facing 的 NLB.
kubectl apply -f 02-nlb-basic.ymlservice/nlb-basic createdkubectl describe svc/nlb-basicName: nlb-basic
Namespace: default
Labels: app=nlb-basic
Annotations: service.beta.kubernetes.io/aws-load-balancer-scheme: internet-facing
Selector: app=app1
Type: LoadBalancer
IP Family Policy: SingleStack
IP Families: IPv4
IP: 10.100.209.193
IPs: 10.100.209.193
LoadBalancer Ingress: k8s-default-nlbbasic-7390408e99-955fcad20bd8e660.elb.us-east-1.amazonaws.com
Port: <unset> 80/TCP
TargetPort: 80/TCP
NodePort: <unset> 30685/TCP
Endpoints: 192.168.84.164:80,192.168.94.180:80
Session Affinity: None
External Traffic Policy: Cluster
Events:
Type Reason Age From Message
---- ------ ---- ---- -------
Normal SuccessfullyReconciled 3m20s service Successfully reconciled验证 AWS 资源
在 AWS 控制台中验证 ELB 已创建完成
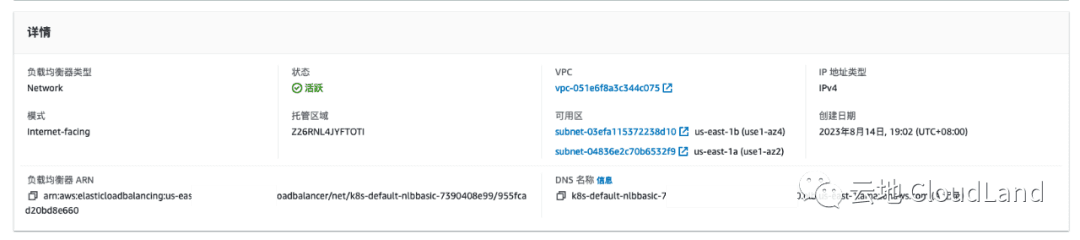
listener

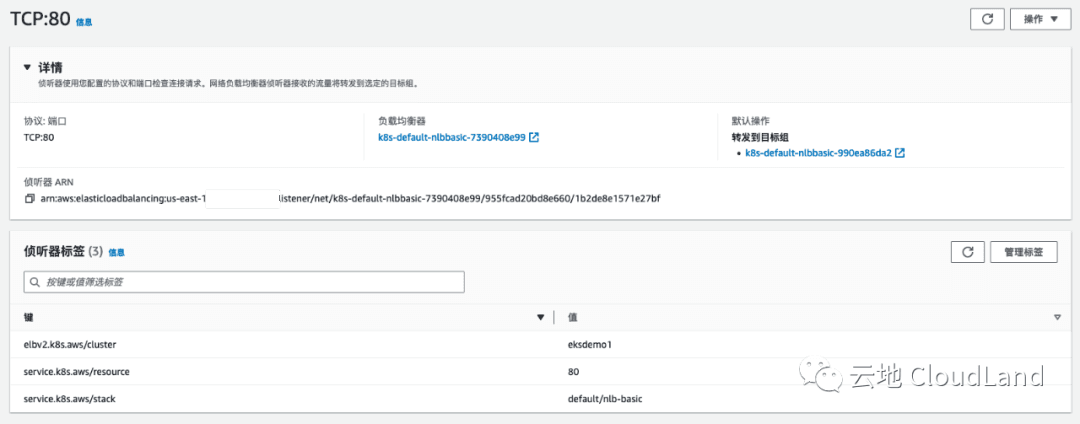
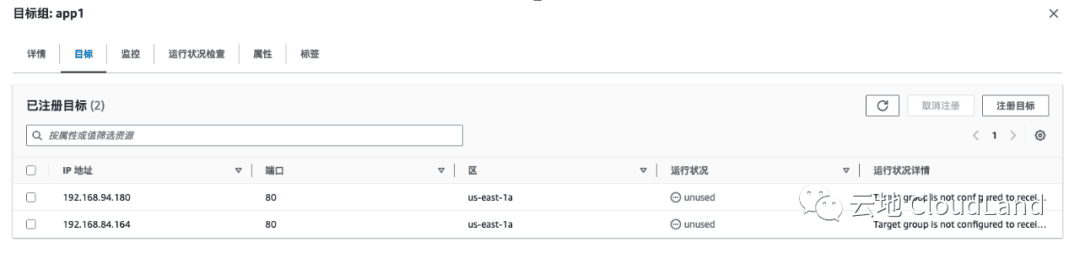
TargetGroup
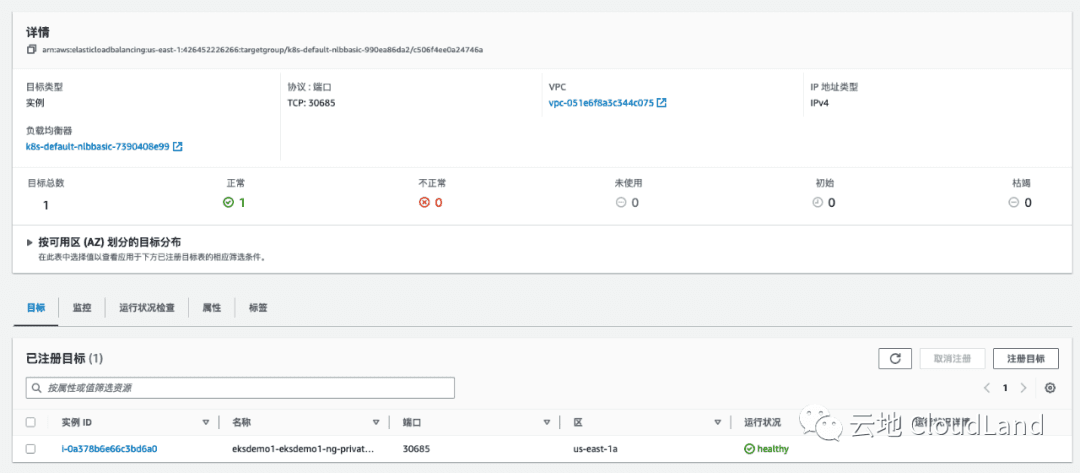
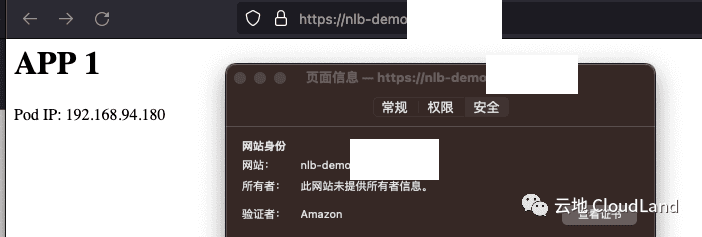
访问验证
curl k8s-default-nlbbasic-7390408e99-955fcad20bd8e660.elb.us-east-1.amazonaws.com<html>
<head><title>App1</title></head>
<body>
<h1>APP 1</h1>
<p>Pod IP: 192.168.84.164</p>
</body>
</html>04 添加健康检查探针
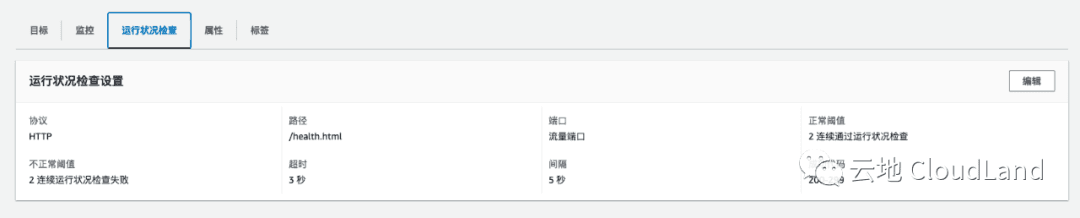
添加 Annotation
通过添加以上 annotation 就可以自定义所需的健康检查探针
apiVersion: v1
kind: Service
metadata:
  name: nlb-with-health
  labels:
    app: nlb-with-health
  annotations:
    service.beta.kubernetes.io/aws-load-balancer-scheme: "internet-facing"
    # Health Check
    service.beta.kubernetes.io/aws-load-balancer-healthcheck-protocol: http
    service.beta.kubernetes.io/aws-load-balancer-healthcheck-port: traffic-port
    service.beta.kubernetes.io/aws-load-balancer-healthcheck-path: "/health.html"
    service.beta.kubernetes.io/aws-load-balancer-healthcheck-healthy-threshold: "2"
    service.beta.kubernetes.io/aws-load-balancer-healthcheck-unhealthy-threshold: "2"
    service.beta.kubernetes.io/aws-load-balancer-healthcheck-interval: "5"
    service.beta.kubernetes.io/aws-load-balancer-healthcheck-success-codes: "200-299"
    service.beta.kubernetes.io/aws-load-balancer-healthcheck-timeout: "3"
spec:
  type: LoadBalancer
  selector:
    app: app1
  ports:
    - port: 80
targetPort: 80kubectl apply -f 03-nlb-with-healthz.ymlservice/nlb-with-health createdkubectl describe svc/nlb-with-healthName: nlb-with-health
Namespace: default
Labels: app=nlb-with-health
Annotations: service.beta.kubernetes.io/aws-load-balancer-healthcheck-healthy-threshold: 2
service.beta.kubernetes.io/aws-load-balancer-healthcheck-interval: 5
service.beta.kubernetes.io/aws-load-balancer-healthcheck-path: /health.html
service.beta.kubernetes.io/aws-load-balancer-healthcheck-port: traffic-port
service.beta.kubernetes.io/aws-load-balancer-healthcheck-protocol: http
service.beta.kubernetes.io/aws-load-balancer-healthcheck-success-codes: 200-299
service.beta.kubernetes.io/aws-load-balancer-healthcheck-timeout: 3
service.beta.kubernetes.io/aws-load-balancer-healthcheck-unhealthy-threshold: 2
service.beta.kubernetes.io/aws-load-balancer-scheme: internet-facing
Selector: app=app1
Type: LoadBalancer
IP Family Policy: SingleStack
IP Families: IPv4
IP: 10.100.175.122
IPs: 10.100.175.122
LoadBalancer Ingress: k8s-default-nlbwithh-3f1a7c2486-f2466fddeb8de243.elb.us-east-1.amazonaws.com
Port: <unset> 80/TCP
TargetPort: 80/TCP
NodePort: <unset> 30809/TCP
Endpoints: 192.168.84.164:80,192.168.94.180:80
Session Affinity: None
External Traffic Policy: Cluster
Events:
Type Reason Age From Message
---- ------ ---- ---- -------
Normal SuccessfullyReconciled 64s service Successfully reconciled验证 ELB 配置正常
kubectl get podNAME READY STATUS RESTARTS AGE
app1-deployment-5d849c95f8-cjm6s 1/1 Running 0 39m
app1-deployment-5d849c95f8-jgdgh 1/1 Running 0 39m
app2-deployment-c9d464ff8-b99z5 1/1 Running 0 39m
app2-deployment-c9d464ff8-pl2xq 1/1 Running 0 39m
mysql-client-pod 1/1 Running 0 21h验证容器日志
可以看到在容器日志中也可以看到探针正常运行.
kubectl logs app1-deployment-5d849c95f8-cjm6s | tail -3192.168.93.28 - - [14/Aug/2023:11:35:45 +0000] "GET /health.html HTTP/1.1" 200 13 "-" "ELB-HealthChecker/2.0" "-"
192.168.93.28 - - [14/Aug/2023:11:35:47 +0000] "GET /health.html HTTP/1.1" 200 13 "-" "ELB-HealthChecker/2.0" "-"
192.168.93.28 - - [14/Aug/2023:11:35:49 +0000] "GET /health.html HTTP/1.1" 200 13 "-" "ELB-HealthChecker/2.0" "-"05 使用 IP mode
默认状态下, 会使用 Instance Mode, 添加以下 annotation 可以显性声明使用 IP Mode.
service.beta.kubernetes.io/aws-load-balancer-nlb-target-type: ip
# service.beta.kubernetes.io/aws-load-balancer-nlb-target-type: instance
来看一下使用默认状态下创建的 NLB nlb-basic

kubectl describe svc/nlb-basicName: nlb-basic
Namespace: default
Labels: app=nlb-basic
Annotations: service.beta.kubernetes.io/aws-load-balancer-scheme: internet-facing
Selector: app=app1
Type: LoadBalancer
IP Family Policy: SingleStack
IP Families: IPv4
IP: 10.100.209.193
IPs: 10.100.209.193
LoadBalancer Ingress: k8s-default-nlbbasic-7390408e99-955fcad20bd8e660.elb.us-east-1.amazonaws.com
Port: <unset> 80/TCP
TargetPort: 80/TCP
NodePort: <unset> 30685/TCP
Endpoints: 192.168.84.164:80,192.168.94.180:80
Session Affinity: None
External Traffic Policy: Cluster
Events:
Type Reason Age From Message
---- ------ ---- ---- -------
Normal SuccessfullyReconciled 42m service Successfully reconciled可以看到在默认状态下, ELB TG 暴露的是 Service 中 nodeport.
kubectl describe svc/nlb-ip-modeName: nlb-ip-mode
Namespace: default
Labels: app=nlb-ip-mode
Annotations: service.beta.kubernetes.io/aws-load-balancer-healthcheck-healthy-threshold: 2
service.beta.kubernetes.io/aws-load-balancer-healthcheck-interval: 5
service.beta.kubernetes.io/aws-load-balancer-healthcheck-path: /health.html
service.beta.kubernetes.io/aws-load-balancer-healthcheck-port: traffic-port
service.beta.kubernetes.io/aws-load-balancer-healthcheck-protocol: http
service.beta.kubernetes.io/aws-load-balancer-healthcheck-success-codes: 200-299
service.beta.kubernetes.io/aws-load-balancer-healthcheck-timeout: 3
service.beta.kubernetes.io/aws-load-balancer-healthcheck-unhealthy-threshold: 2
service.beta.kubernetes.io/aws-load-balancer-nlb-target-type: ip
service.beta.kubernetes.io/aws-load-balancer-scheme: internet-facing
Selector: app=app1
Type: LoadBalancer
IP Family Policy: SingleStack
IP Families: IPv4
IP: 10.100.240.126
IPs: 10.100.240.126
LoadBalancer Ingress: k8s-default-nlbipmod-b4cd0ee307-66c0958e88e3e8a5.elb.us-east-1.amazonaws.com
Port: <unset> 80/TCP
TargetPort: 80/TCP
NodePort: <unset> 32610/TCP
Endpoints: 192.168.84.164:80,192.168.94.180:80
Session Affinity: None
External Traffic Policy: Cluster
Events:
Type Reason Age From Message
---- ------ ---- ---- -------
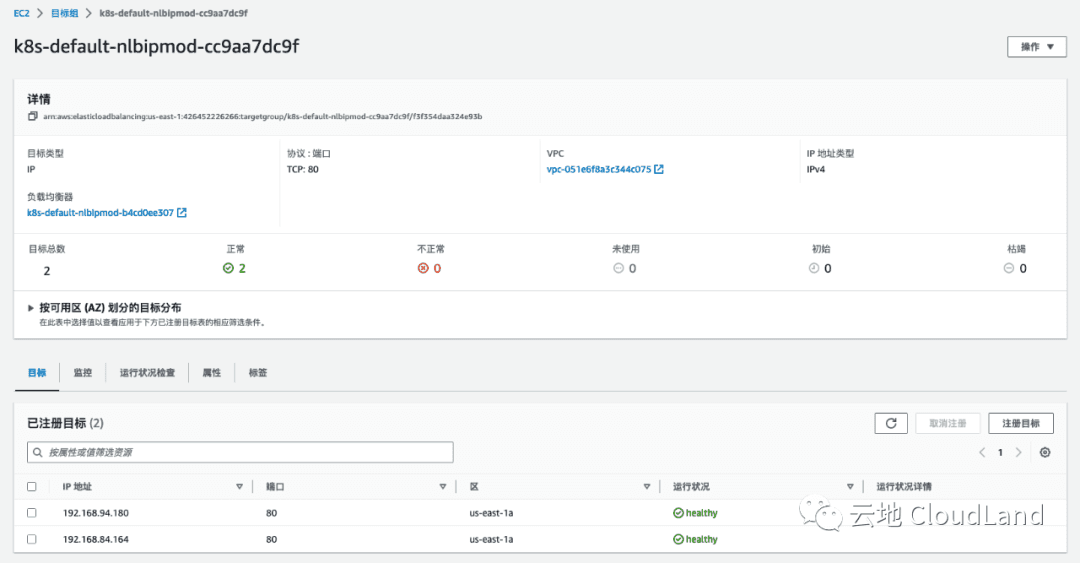
Normal SuccessfullyReconciled 8m50s service Successfully reconciled而在 IP Mode 下, 我们可以看到 Target 是pod 的 endpoint.
06 使用 SSL
注意 : 本 Demo 需要你有一个域名
创建证书
在 AWS 控制台中, 找到 ACM ( AWS Certificate Manger ) 申请一个自己域名的证书.
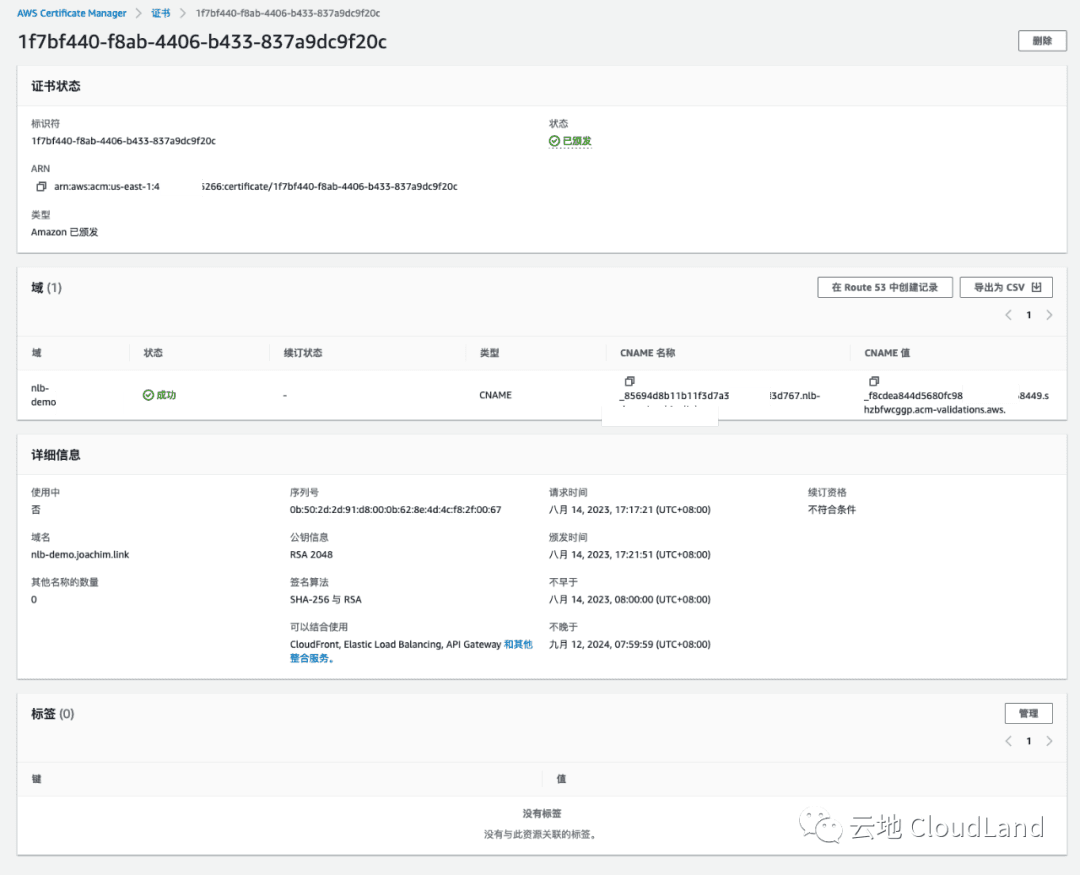
你需要在你的域名当中添加制定 CNAME 进行验证, 验证通过好 ACM 中会如图有显示成功状态.
部署 Loadbalancer
apiVersion: v1
kind: Service
metadata:
  name: nlb-with-ssl
  labels:
    app: nlb-with-ssl
  annotations:
    service.beta.kubernetes.io/aws-load-balancer-scheme: "internet-facing"


    # Health Check
    service.beta.kubernetes.io/aws-load-balancer-healthcheck-protocol: http
    service.beta.kubernetes.io/aws-load-balancer-healthcheck-port: traffic-port
    service.beta.kubernetes.io/aws-load-balancer-healthcheck-path: "/health.html"
    service.beta.kubernetes.io/aws-load-balancer-healthcheck-healthy-threshold: "2"
    service.beta.kubernetes.io/aws-load-balancer-healthcheck-unhealthy-threshold: "2"
    service.beta.kubernetes.io/aws-load-balancer-healthcheck-interval: "5"
    service.beta.kubernetes.io/aws-load-balancer-healthcheck-success-codes: "200-299"
    service.beta.kubernetes.io/aws-load-balancer-healthcheck-timeout: "3"

    # Target Type
    service.beta.kubernetes.io/aws-load-balancer-nlb-target-type: ip
    # service.beta.kubernetes.io/aws-load-balancer-nlb-target-type: instance

    # SSL
    service.beta.kubernetes.io/aws-load-balancer-ssl-cert: "arn:aws:acm:us-east-1:426452226266:certificate/1f7bf440-f8ab-4406-b433-837a9dc9f20c"
    service.beta.kubernetes.io/aws-load-balancer-ssl-ports: "443"
    service.beta.kubernetes.io/aws-load-balancer-ssl-negotiation-policy: "ELBSecurityPolicy-TLS13-1-2-2021-06"
    service.beta.kubernetes.io/aws-load-balancer-backend-protocol: "http"

spec:
  type: LoadBalancer
  selector:
    app: app1
  ports:
    - port: 443
targetPort: 80- 启用 SSL 需要添加标及的几项 annotation. 其中
aws-load-balancer-ssl-cert则是你刚刚申请的证书 ARN. - 接下来你需要修改listener的端口.
kubectl apply -f 05-nlb-with-ssl.ymlservice/nlb-with-ssl createdkubectl describe svc/nlb-with-sslName: nlb-with-ssl
Namespace: default
Labels: app=nlb-with-ssl
Annotations: service.beta.kubernetes.io/aws-load-balancer-backend-protocol: http
service.beta.kubernetes.io/aws-load-balancer-healthcheck-healthy-threshold: 2
service.beta.kubernetes.io/aws-load-balancer-healthcheck-interval: 5
service.beta.kubernetes.io/aws-load-balancer-healthcheck-path: /health.html
service.beta.kubernetes.io/aws-load-balancer-healthcheck-port: traffic-port
service.beta.kubernetes.io/aws-load-balancer-healthcheck-protocol: http
service.beta.kubernetes.io/aws-load-balancer-healthcheck-success-codes: 200-299
service.beta.kubernetes.io/aws-load-balancer-healthcheck-timeout: 3
service.beta.kubernetes.io/aws-load-balancer-healthcheck-unhealthy-threshold: 2
service.beta.kubernetes.io/aws-load-balancer-nlb-target-type: ip
service.beta.kubernetes.io/aws-load-balancer-scheme: internet-facing
service.beta.kubernetes.io/aws-load-balancer-ssl-cert: arn:aws:acm:us-east-1:426452226266:certificate/1f7bf440-f8ab-4406-b433-837a9dc9f20c
service.beta.kubernetes.io/aws-load-balancer-ssl-negotiation-policy: ELBSecurityPolicy-TLS13-1-2-2021-06
service.beta.kubernetes.io/aws-load-balancer-ssl-ports: 443
Selector: app=app1
Type: LoadBalancer
IP Family Policy: SingleStack
IP Families: IPv4
IP: 10.100.137.179
IPs: 10.100.137.179
LoadBalancer Ingress: k8s-default-nlbwiths-f1bc75ea1d-ee22538d516c976a.elb.us-east-1.amazonaws.com
Port: <unset> 443/TCP
TargetPort: 80/TCP
NodePort: <unset> 30103/TCP
Endpoints: 192.168.84.164:80,192.168.94.180:80
Session Affinity: None
External Traffic Policy: Cluster
Events:
Type Reason Age From Message
---- ------ ---- ---- -------
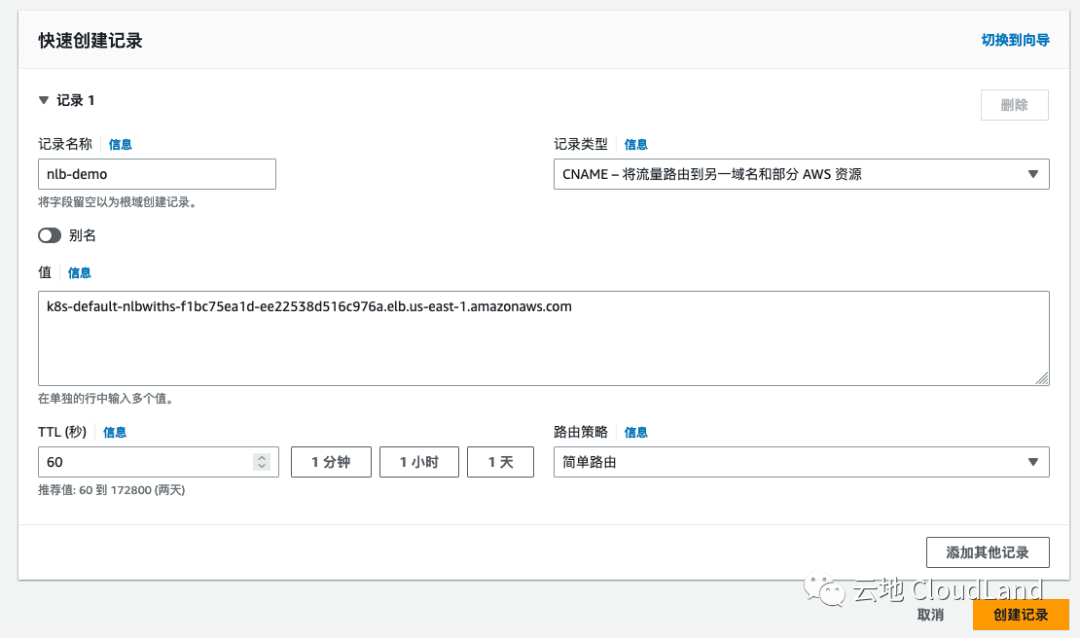
Normal SuccessfullyReconciled 25s service Successfully reconciled在创建NLB过程时, 你可以进行域名解析的修改, 我的域名是使用 R53 进行管理的, 仅此参考.
验证
然后在浏览器中, 验证配置生效.
07 使用 TGB 绑定原有的 Target Group
绑定原有TG : 在 AWS ELB Controller 中, 还定义了另外一种 CR, TargetGroupBinding . 使用 TGB, 你可以将 K8S 中的 SVC 绑定你已经设置好的 Target Group 上.
手动创建 Target Group

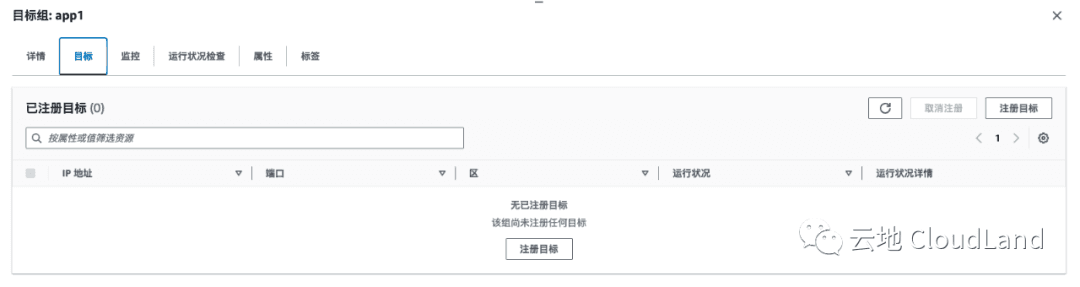
配置如上所示, 这时 Target 为空.
创建 Service
首先创建一个 service, 注意不要写 Type, 使用 clusterIP 类型.
apiVersion: v1
kind: Service
metadata:
  name: app1-svc
spec:
#  type: LoadBalancer
  ports:
    - port: 80
      targetPort: 80
  selector:
app: app1kubectl apply -f 06-TG-binding/01-app1-svc.ymlservice/app1-svc createdkubectl describe svc/app1-svcName: app1-svc
Namespace: default
Labels: <none>
Annotations: <none>
Selector: app=app1
Type: ClusterIP
IP Family Policy: SingleStack
IP Families: IPv4
IP: 10.100.181.123
IPs: 10.100.181.123
Port: <unset> 80/TCP
TargetPort: 80/TCP
Endpoints: 192.168.84.164:80,192.168.94.180:80
Session Affinity: None
Events: <none>创建 TGB (TargetGroupBinding)
apiVersion: elbv2.k8s.aws/v1beta1
kind: TargetGroupBinding
metadata:
  name: app1-tgb
spec:
  targetGroupARN: "arn:aws:elasticloadbalancing:us-east-1:426451223266:targetgroup/app1/70f22a8e5d14ad9d"
  targetType: ip

  serviceRef:
    name: app1-svc
port: 80kubectl apply -f 06-TG-binding/02-tg-binding.yml此时我们在 AWS 控制台中可以看到, 此 TG 已经关联好了我们部署在 eks 中的 service 了.